


Scorpion: How To Finally Nail The Hardest Yoga Pose
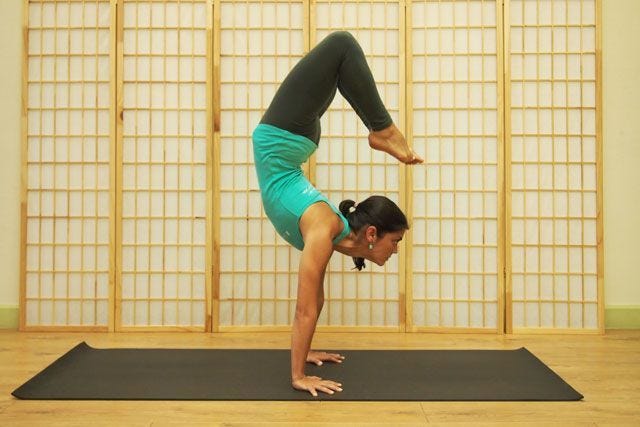 Photo: Courtesy of Rina Yoga.
Rina Jakubowicz of Rina Yoga in Miami, Florida gives R29 a breakdown of the three yoga drills you need to help nail your scorpion pose.
While scorpion pose (Vrschikasana) is a difficult pose to master, it provides a challenge that some yogis crave and are determined to conquer. To gain the correct alignment of the pose and optimal strength, you must practice drills, strengthen your core, and master basic yoga poses first. This will not only make it easier to get your scorpion pose, but it will also prevent injury during the process. I have compiled a list of the top three drills, or poses, that anyone looking to master scorpion would ideally practice daily. Keep in mind that it's better to do fewer reps with correct alignment than to do hundreds of reps incorrectly.
AdvertisementADVERTISEMENT
Next, you'll find step-by-step instructions on how to perform each drill, as well as pictures to demonstrate how to properly and improperly perform each pose. Of course, please try these poses slowly, consciously, and with a partner to prevent injury.
 Photo: Courtesy of Rina Yoga.
Dolphin Pose
Begin in your downward-facing dog (Adho Mukha Svanasana), and bring your forearms to the floor. Alignment is very important here — keep your elbows shoulder-width apart without falling out to the side. Palms are facing down and hands are flat on the floor. Push the floor away from you so that the base of your index finger is pressed against the mat. Do not collapse your chest, and keep your quads and core engaged.
 Photo: Courtesy of Rina Yoga.
From forearm downward-facing dog, inhale and bring your body weight forward into a plank position, without allowing your shoulders to go lower than your hips. Your plank should be completely parallel to the floor. Do this in front of a mirror to make sure that you are correctly aligned. Pause here. Then, exhale and push your hips back up towards the ceiling into your forearm downward-facing dog. Inhale again forward into your plank, and exhale back into forearm downward-facing dog, keeping your body in one line. Repeat this 10 times, then rest in child’s pose. For optimal results, do this drill at least three times per day.
 Photo: Courtesy Of Rina Yoga.
Beginner's Modification: If you notice your hips are sagging lower than your chest or your chest is collapsing (see above), modify the pose so that you're on your knees. Still, be mindful to keep your quads, belly, and arms engaged and tight.
AdvertisementADVERTISEMENT
 Photo: Courtesy of Rina Yoga.
Downward Facing Dog Core Drills
From your downward-facing dog, inhale and lift up your right leg while keeping your hips square.
 Photo: Courtesy Of Rina Yoga.
When raising your leg with this drill, it's very important to keep your hips square with the floor. Try not to rotate your hips and foot to the side, as shown above. This is incorrect form.
 Photo: Courtesy Of Rina Yoga.
Next, exhale, bringing the right knee into the chest, and lean your body weight forward, putting your shoulders in front of your wrists. Pause for a moment, pushing the floor away from you. Inhale and extend the right leg out again, keeping your hip square to the floor. Then exhale and pull the leg in again close to the chest. Repeat this 10 times aligned, then rest in child’s pose for five breaths. Switch to the left leg for the same number of repetitions.
 Photo: Courtesy Of Rina Yoga.
When bringing the knee to the chest, it's important to keep it suspended as close to your body as possible, rather than letting it drop to the ground underneath you (see above). This is incorrect form.
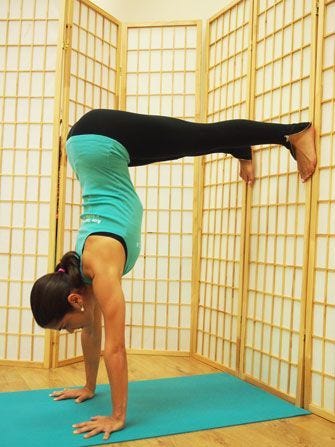 Photo: Courtesy of Rina Yoga.
Handstand Drill Using Wall as Support
You'll need a wall for this drill. Face away from the wall and place your hands flat on the floor. Make sure your hands are shoulder-width apart (not any wider) and press the base of the index finger into the floor. Placing one foot against the wall, press it into the wall to lift your hips up. If you feel like you're falling or slipping off the wall, press harder into the wall and engage your core. When you press up, try to create an “L” shape with your body, creating a 90-degree angle. You may want to do this near a mirror at first so that you can see your alignment. Hold this pose for five breaths, come down, and rest for five breaths by stretching your wrists. Then, repeat the pose three more times.
AdvertisementADVERTISEMENT
 Photo: Courtesy of Rina Yoga.
Because alignment and transitioning into the pose correctly is key, you'll want to engage your Uddiyana Bandha and your core. This takes a lot of strength so take it easy when you feel it getting too difficult. Make sure that you are not collapsing your back and creating a banana with your spine (shown here). This is incorrect form.
I advise my clients to stay away from using the wall to fall back on when they are kicking up to their headstand or handstand. The wall acts as a crutch and does not allow you to utilize the necessary muscles in your core to gain proper strength and stability. So, let’s say “goodbye” to the wall and become more conscious on maintaining proper posture!
Send me pictures of your straight back inversions and I will be happy to repost on my Instagram and give you advice on how to correct it!
Approaching a challenging pose like scorpion takes practice, dedication, and training. The practice of these drills and poses with focus and proper alignment will assist you in approaching scorpion pose.
AdvertisementADVERTISEMENT