ADVERTISEMENT
ADVERTISEMENT

Insanely Easy Desserts To Make Right Now

Tradition dictates that breakfast is the most important meal of the day. But here at Refinery29, we have no problem bucking convention. Nothing against breakfast, it’s just that dessert is, um, better. But whipping it up, Momofuku-style, isn't always easy. Between work, friends, and having a life, jumping into an elaborate cooking project isn’t always realistic.
That's why we’ve whipped up three fail-proof, time-sensitive, cuh-razy good recipes. With just a few basic ingredients and a little confidence, you’ll have a dessert worthy of serious admiration. If you can bring yourself to share, that is.
01IceCream_Final_01071812_24-copy
Strawberry Shortcut Cake
Nothing says summer like a sweet, fruity plate of strawberry shortcake. But there’s nothing short about the recipe, except our temper about two hours in when we’re still whipping heavy cream and waiting for biscuits to cool. So, we’re going to skip the drama and go straight to the good stuff. This revamp is just as rich and fluffy as the original, with about sixteen fewer steps. Individual portions can be stored easily in the freezer for over a week, making them a great treat for impromptu summer dinner parties. Or a midnight snack. Or breakfast.
AdvertisementADVERTISEMENT
02IceCream_Step1_071812_07

What You'll Need:
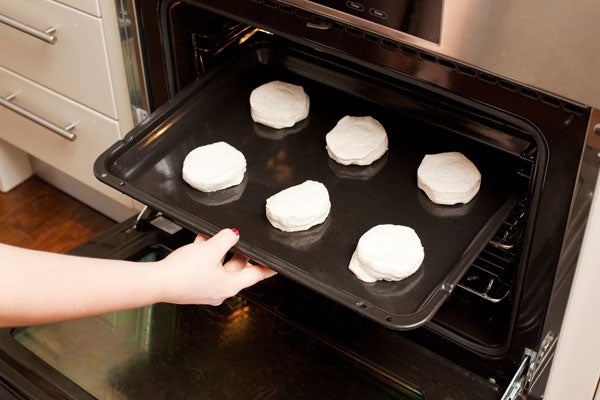
1 tube Pillsbury Grands Homestyle biscuits
1 half-gallon vanilla bean ice cream
2 cups fresh strawberries

03IceCream_Step2_071912_09
Step 1: Pop open the biscuits, and bake ‘em up as directed.
04IceCream_Step3_071912_03
Step 2: Pop 'em in!
05IceCream_Step4_071912_12
Step 3: Chop strawberries into thick slices. Don’t get too fussy here — they’ll get more smushed in the next step.
06IceCream_Step5_071912_03
Step 4: Scoop ice cream into a large bowl.
07IceCream_Step6_071912_03
Step 5: Mix in strawberries until well incorporated.
08IceCream_Step7_071912_08

Why are you doing all this chopping and mixing, instead of just buying strawberry ice cream? Simple: it tastes better. Generally, strawberry ice cream isn’t made with
high-quality vanilla. And who wouldn’t take a fresh, juicy berry over one that’s been frozen for months? What you’ve just whipped up will taste as rich, creamy and fresh as ice cream made from scratch. Don’t believe us? Take a taste (like you haven’t already).

10IceCream_Step9_071912_05
Step 6: If your ice cream is too mushy to scoop, just pop it back in the freezer for a few minutes while you prep the next step.
09IceCream_Step8_071912_06
Step 7:Slice biscuits in half,
11IceCream_Step10_071912_06
Step 8: Spoon about a half-cup scoop onto to the bottom slice.
12IceCream_Step11_071912_03

Step 9: Replace
the top.

13IceCream_Final_01071812_24
BOOM!
14Popcorn_Final_071812_45
Sweet & Salty Caramel Corn
We love serving up sweets to our guests – but doing their dishes? Not so much. This dessert serves your inner lazy girl before and after the meal. It requires exactly 2 pieces of equipment: a pot, and a paper bag. Those tools + 5 Ingredients ÷ 10 minutes = one of the most popular treats you will ever serve (this is a proven fact). When you’re really in a jam, this crowd favorite will keep the guests happy, the kitchen pristine, and the hostess very popular.
AdvertisementADVERTISEMENT
15Popcorn_Step1_071812_21

What You'll Need:
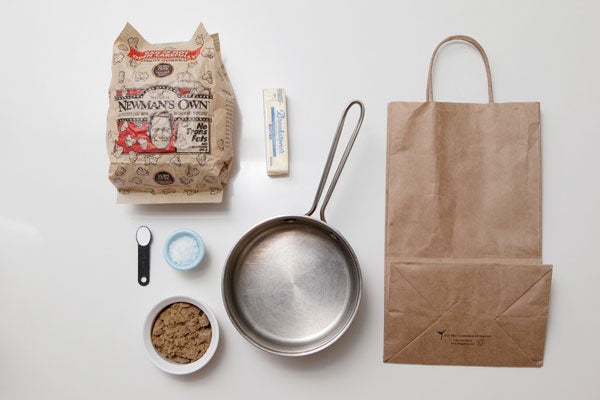
2 bags microwave popcorn, popped
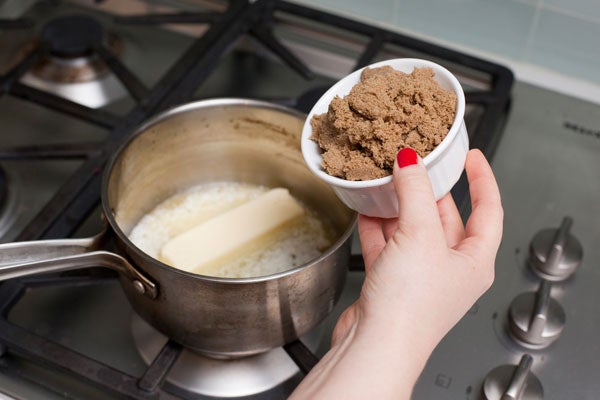
1 stick salted butter
1 ½ cups light brown sugar
½ tsp baking soda
½ tbsp sea salt (or more, to your taste)

16Popcorn_Step2_071812_03
Step 1: Place a stick of butter into a heated saucepan at medium-high heat.
17Popcorn_Step2_071812_08
So meltyyyy.
18Popcorn_Step3_071812_02
Step 2: Melt sugar into it.
19Popcorn_Step4_071812_12
Step 3: Whisk continuously to combine, until it starts to bubble. Let the caramel bubble for another minute or so – it’ll start to look like, duh, caramel.
20Popcorn_Step4_071812_16
Step 4: Remove from heat and whisk in the baking soda.
21Popcorn_Step4_071812_18
Make sure it's all incorporated.
22Popcorn_Step5_071812_06
Step 5: Empty microwave popcorn into a large paper bag.
23Popcorn_Step6_071812_03
Step 6: Immediately pour the caramel mixture over the popcorn.
24Popcorn_Step7_071812_03
Step 7: Fold the bag shut and shake, shake, shake.
25Popcorn_Step8_071812_09
Step 8: Pour into a large serving bowl and sprinkle with sea salt. The caramel will dry on quickly, and then you can break up any remaining stuck-together-bits easily.
26Popcorn_Final_071812_45-copy
Place in the middle of the table, and watch as your guests lunge forward. Beam with pride at the feeding frenzy. Repeat, as needed.
27Truffles_Final_071812_25
Cheater Chocolate Truffles
When we think of truffles, most people think of the decadent, crazy-rich, ooey-gooey chocolate treat displayed in the windows of fancy-pants confectioners. This is the exact same thing – minus the fancy pants. We’ve replaced the traditional ganache base with one that takes about a half the time and a tenth of the skill level. Basically, you get a bunch of chocolate together, stir in some cream cheese, and roll it in something pretty. In your face, Wonka.
AdvertisementADVERTISEMENT
28Truffles_Step1_071812_22

What You'll Need:
1 cup semisweet chocolate chips
1 cup milk chocolate
1 cup dark chocolate
1 cup confectioners sugar
1 8 oz. package cream cheese
Topping Options: Cocoa powder, espresso, coconut, sprinkles, sliced almonds, corn flakes, marbles, telephones, junk mail – you get the picture?

29Truffles_Step2_071912_05
Step 1: Place a slab of cream cheese into a mixing bowl.
30Truffles_Step3_071912_03
Step 2: Add the confectioner's sugar.
31Truffles_Step4_071912_09
Step 3: Cream the two together. This will be more like mashing at first, but it’ll start to smooth out after a minute.
32Truffles_Step5_071912_04
Step 4: Melt all three chocolates together in a saucepan and whisk until combined.
33Truffles_Step6_071912_10
Try your very best not to eat everything right now.
34Truffles_Step7_071912_05
Step 5: Pour melted chocolate over cream cheese mixture.
35Truffles_Step8_071912_06
Step 6: Stir until well combined. (A rubber spatula is your best friend, here.)
36Truffles_Step9_071912_07
Step 7: Let your chocolate chill in the fridge for about an hour (30 mins in the freezer, if you’re in a hurry). Note that this base will keep in the freezer for up to a month. As you’ll see, a little goes a long way, so you may have some left over — keep it.
37Truffles_Step10_071912_04
Step 8: Using a tablespoon or melon-baller, scoop a lump of chocolate out of the bowl. Have your toppings ready!
38Truffles_Step11_071912_10
Step 9: Roll the chocolate into a ball-ish shape. The heat from your hands will soften the mixture and allow you to mold it as you go.
39Truffles_Step12_071912_27

Step 10: Roll the truffle in your topping of choice. Often, it’s easier to perfect the ball shape
during this step.

AdvertisementADVERTISEMENT
40Truffles_Final_071812_25-copy
But honestly – who cares if it’s an imperfect sphere? There is no such thing as an imperfect truffle.


Decor tips, career advice, inspired design — get it all on our Refinery29 Living Facebook Page!

More from Food & Drinks

R29 Original Series

AdvertisementADVERTISEMENT
ADVERTISEMENT